
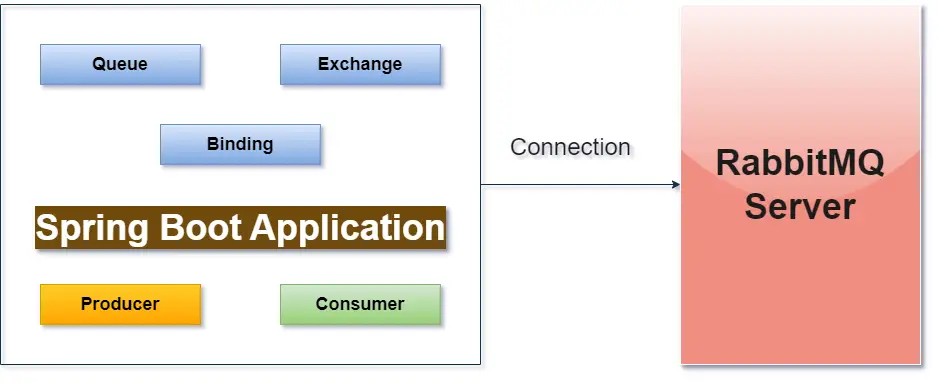
Spring Boot + RabbitMQ Architecture
Prerequisites
Before you begin, make sure you have the following tools and dependencies installed:
- Java JDK (8 or higher)
- Spring Boot
- RabbitMQ Server (installed and running)(For RabbitMQ configuration please see RabbitMQ Configuration on ubuntu or windows.)
Step-by-Step Implementation
Step 1: Setup Spring Boot Application
If you do not have spring boot application then got to spring initializr and build the project. While building the project then add given dependency.
- Spring for RabbitMQ
- Spring AMQP(RabbitMQ)
- Spring Web
- Lombok
Step 2: Spring Boot Auto Configuration for spring AMQP(RabbitMQ).
Go to application.properties file and configuration given properties for RabbitMQ connection.
##RabbitMQ Connection Configuration
spring.application.name=rabbitmqDemo
spring.rabbitmq.host=localhost
spring.rabbitmq.port=5672
spring.rabbitmq.username=guest
spring.rabbitmq.password=guest

## rabbitmq
rabbitmq.queue.name=stringQueue
rabbitmq.exchange.name=exchange
rabbitmq.routing.key=stringRouting

## rabbitmq json
rabbitmq.queue.json.name=jsonQueue
rabbitmq.routing.json.key=jsonRouting
Step 3: Create given packages under application.
- config
- consumer
- controller
- dto
- publisher
Step 4: Configure Queue and Exchange.
Go to config package and create RabbitMQConfig class.
import org.springframework.amqp.core.AmqpTemplate;
import org.springframework.amqp.core.Binding;
import org.springframework.amqp.core.BindingBuilder;
import org.springframework.amqp.core.Queue;
import org.springframework.amqp.core.TopicExchange;
import org.springframework.amqp.rabbit.connection.ConnectionFactory;
import org.springframework.amqp.rabbit.core.RabbitTemplate;
import org.springframework.amqp.support.converter.Jackson2JsonMessageConverter;
import org.springframework.amqp.support.converter.MessageConverter;
import org.springframework.beans.factory.annotation.Value;
import org.springframework.context.annotation.Bean;
import org.springframework.context.annotation.Configuration;

@Configuration
public class Config {

	@Value("${rabbitmq.queue.name}")
	private String queue;

	@Value("${rabbitmq.queue.json.name}")
	private String jsonQueue;

	@Value("${rabbitmq.exchange.name}")
	private String exchange;

	@Value("${rabbitmq.routing.key}")
	private String routingKey;

	@Value("${rabbitmq.routing.json.key}")
	private String jsonRoutingKey;

	// spring bean for string queue
	@Bean
	public Queue queue() {
		return new Queue(queue);
	}

	// spring bean for string exchange
	@Bean
	public TopicExchange exchange() {
		return new TopicExchange(exchange);
	}

	// spring bean for binding between queue and exchange with routing key
	@Bean
	public Binding binding() {
		return BindingBuilder.bind(queue())
				     .to(exchange())
				     .with(routingKey);
	}


// For string no need to create given beans
//	A) Rabbit Template
//	B) Connection Factory
//	C) Rabbit Admin

	// spring bean for json queue
	@Bean
	public Queue jsonQueue() {
		return new Queue(jsonQueue);
	}

	// spring bean for binding between queue and exchange with routing key for json
	@Bean
	public Binding jsonBinding() {
		return BindingBuilder.bind(jsonQueue())
				     .to(exchange())
				     .with(jsonRoutingKey);
	}

	// message convertor
	@Bean
	public MessageConverter convertor() {
		return new Jackson2JsonMessageConverter();
	}

	// create rabbitmq template for json
	@Bean
	public AmqpTemplate amqpTemplate(ConnectionFactory connectionFactory) {

		RabbitTemplate rabbitTemplate = new RabbitTemplate(connectionFactory);
		rabbitTemplate.setMessageConverter(convertor());
		return rabbitTemplate;
	}
}
In this configuration class:
- queue() and exchange() bean return queue name and exchange name respectively for string message.(producer send string message to RabbitMQ)
- binding() bean for binding between queue and exchange with routing key for string message.(producer send string message to RabbitMQ)
- For string message no need to create Rabbit Template and Connection Factory
- jsonQueue() bean return jsonQueue name.(producer send JSON message to RabbitMQ)
- jsonBinding() bean for binding between jsonQueue and exchange with jsonRouting key for JSON message.(producer send JSON message to RabbitMQ)
- convertor() bean use for message convertor.
- amqpTemplate() bean use for JsonTemplate.(producer send json message to RabbitMQ)
Step 5: Create RabbitMQ Procedure
Go to publisher package and
- Create RabbitMQProducer class for send message(string message) to RabbitMQ Queue.
- Create RabbitMQJsonProducer class for send json message to RabbitMQ Queue.
import org.slf4j.Logger;
import org.slf4j.LoggerFactory;
import org.springframework.amqp.rabbit.core.RabbitTemplate;
import org.springframework.beans.factory.annotation.Autowired;
import org.springframework.beans.factory.annotation.Value;
import org.springframework.stereotype.Service;

@Service
public class RabbitMQProducer {

	@Value("${rabbitmq.exchange.name}")
	private String exchange;

	@Value("${rabbitmq.routing.key}")
	private String routingKey;
	private static final Logger LOGGER = LoggerFactory.getLogger(RabbitMQProducer.class);

	@Autowired
	private RabbitTemplate rabbitTemplate;

	public void sendMessage(String message) {
		LOGGER.info("Message send:: [{}]", message);
		rabbitTemplate.convertAndSend(exchange, routingKey, message);
	}

}
Send JSON Message to RabbitMQ Server
import org.slf4j.Logger;
import org.slf4j.LoggerFactory;
import org.springframework.amqp.rabbit.core.RabbitTemplate;
import org.springframework.beans.factory.annotation.Autowired;
import org.springframework.beans.factory.annotation.Value;
import org.springframework.stereotype.Service;

import com.fullstackblogs.rabbitmqDemo.dto.User;

@Service
public class RabbitMQJsonProducer {

	@Value("${rabbitmq.exchange.name}")
	private String exchange;

	@Value("${rabbitmq.routing.json.key}")
	private String jsonRoutingKey;


	private static final Logger LOGGER = LoggerFactory.getLogger(RabbitMQJsonProducer.class);

	@Autowired
	private RabbitTemplate rabbitTemplate;


	public void sendMessage(User user) {
		LOGGER.info("Message json send:: [{}]", user);
		rabbitTemplate.convertAndSend(exchange, jsonRoutingKey, user);
	}
}
Step 6: Create Rest API to Send Message
Go to controller package and
- Create MessageController class for send string message
- Create MessageJsoncController class for send json message
import org.slf4j.Logger;
import org.slf4j.LoggerFactory;
import org.springframework.beans.factory.annotation.Autowired;
import org.springframework.http.ResponseEntity;
import org.springframework.web.bind.annotation.GetMapping;
import org.springframework.web.bind.annotation.RequestMapping;
import org.springframework.web.bind.annotation.RequestParam;
import org.springframework.web.bind.annotation.RestController;
import com.fullstackblogs.rabbitmqDemo.publisher.RabbitMQProducer;

@RestController
@RequestMapping("api/v1")
public class MessageController {

	private static final Logger LOGGER = LoggerFactory.getLogger(RabbitMQProducer.class);

	@Autowired
	private RabbitMQProducer rabbitMQProducer;

	@GetMapping(value = "/publish")
	public ResponseEntity sendMessage(@RequestParam("message") String message){
		rabbitMQProducer.sendMessage(message);
		return ResponseEntity.ok("Message send to the queue ...");
	}
}
MessageJsonController Class
import org.springframework.beans.factory.annotation.Autowired;
import org.springframework.http.ResponseEntity;
import org.springframework.web.bind.annotation.PostMapping;
import org.springframework.web.bind.annotation.RequestBody;
import org.springframework.web.bind.annotation.RequestMapping;
import org.springframework.web.bind.annotation.RestController;
import com.fullstackblogs.rabbitmqDemo.dto.User;
import com.fullstackblogs.rabbitmqDemo.publisher.RabbitMQJsonProducer;

@RestController
@RequestMapping("api/v2/")
public class MessageJsoncontroller {

	@Autowired
	private RabbitMQJsonProducer rabbitMQJsonProducer;

	@PostMapping(value = "publish")
	public ResponseEntity sendJsonMessage(@RequestBody User user){
		rabbitMQJsonProducer.sendMessage(user);
		return ResponseEntity.ok("Message send to exchange ...");
	}

}
Step 7: Create Rest API to Send Message
Go to consumer package and
- Create RabbitMQConsumer Class for receive string message
- Create RabbitMQJsonConsumer Class for receive JSON message
import org.slf4j.Logger;
import org.slf4j.LoggerFactory;
import org.springframework.amqp.rabbit.annotation.RabbitListener;
import org.springframework.retry.annotation.Backoff;
import org.springframework.retry.annotation.Retryable;
import org.springframework.stereotype.Service;

@Service
public class RabbitMQConsumer {

	private static final Logger LOGGER = LoggerFactory.getLogger(RabbitMQConsumer.class);

	@RabbitListener(queues = "${rabbitmq.queue.name}", concurrency = "5")
	@Retryable(value = { Exception.class }, maxAttempts = 3, backoff = @Backoff(delay = 1000))
	public void consumer(String message) {
		LOGGER.info("Message Recieved :: [{}]", message);
	}

}
JSON Message Consumer Class
import org.slf4j.Logger;
import org.slf4j.LoggerFactory;
import org.springframework.amqp.rabbit.annotation.RabbitListener;
import org.springframework.stereotype.Service;

import com.fullstackblogs.rabbitmqDemo.dto.User;

@Service
public class RabbitMQJsonConsumer {

	private static final Logger LOGGER = LoggerFactory.getLogger(RabbitMQJsonConsumer.class);

	@RabbitListener(queues = "${rabbitmq.queue.json.name}")
	public void consumeJsonMessage(User user) {
		LOGGER.info("Message Recieved :: [{}]",user);
	}
}
Step 8: Go to dto package and create user POJO class
import lombok.Data;

@Data
public class User {
	private Long id;
	private String firstName;
	private String lastName;
}
Now you can run your application and hit given url form postman
For publish string message
- http://localhost:8080/api/v1/publish?message=Hello RabbitMQ
- Api Type:- GET
For publish JSON message
- http://localhost:8080/api/v2/publish
- API TYPE:- POST
- Body:- {“id”: 1, “firstName”: “XYZ”,”lastName”: “XXXX”}
Download complete code here
That’s All